Gravity Field How-to
Equipment needed:
- gravimeter with spare battery
- baseplate
- notebook
- map
- GPS & compass (for navigating; iPad also possible)
- surveying equipment (DGPS or EDM) [usually done separately]
- Emlid RTK: tape measure, tripod, bipod, base and rover units, 50 cm extension, phone/tablet with software& power
- flags (if not presurveyed)
- Jacobs staff can make it easier to get terrain corrections (not essential)
- (radios are often helpful)
Taking a reading: ALIOD instruments (NOAA):
Note that these instruments should be set to the center of the range of expected values for about a half hour before using the ALIOD system. Ideally do this before going to the field. On G-meters, this is changing the fixed dial reading (i.e., spinning down when going up higher) and on D-meters, this involves turning the Reset screw appropriately (counterclockwise to lower the central reading, as you'd want going uphill, clockwise to increase. Manual says 74 mGal per rotation).
1) Place baseplate in the ground, approximately level. Try and find a
spot away from severe local topography.
2) Place gravimeter on the baseplate.
Check that the temperature is correct and that the instrument still
has power (flip on switch and see light in bubble level and in gauge,
or note that the LCD display is still operative).
3) Level gravimeter using the electronic levels (not the bubble levels).
Usually you level the two left screws first (for the tilt towards/away from
the reader), then use the right screw to get the left/right level. Note
that the borrowed instruments have the upper left screw marked as fixed,
so adjust only using the lower left and righthand screws. These obey righthand
rule, so if the mark in the "X-level" (towards/away tilt) gauge is away
from you, you need to raise the lower left screw (make it stik out more),
so you have to turn the screw clockwise (right hand rule).
4) Unlock gravimeter.
5) The "Beam" gauge should quickly settle to the center. The
numbers reported on the LCD should stablilize quickly.
6) Report the reading. Normally the dial remains fixed through the survey
(there is a small set screw at the top of the dial that should prevent the
dial from spinning), but you should always write this number down. The largest
numbers are the odometer-style numbers to the right of the dial. The last
digit on the odometer readout is the largest digit on the dial. Thus if
the digits read 33862 and the dial is at 2.34 the reading is 3386.234 (in
approximate mGal). You then record the LCD display, which is in mGal (assuming
all the calibrations were done properly). Ideally, only this last value
should be changing from measurement to measurement.
7) Lock the instrument, wait for the LCD display to reset to +200 mGal
(which represents a locked position), then unlock the instrument and repeat
(4), (5) & (6)
twice for a total of three readings.
8) LOCK THE INSTRUMENT. Double check this. Turn off the instrument light
if you had turned it on. Pack up the instrument in its case, making sure
the power cable is not caught in the lid.
When carrying the gravimeter, you should put two hands under the case.
Do NOT rely on the handle on top--the clasps occasionally undo themselves.
Reranging D-meter
D meters can only cover ~200 mGal of gravity difference before requiring reranging. Given ~250 mGal difference from CU to Caribou, this is an issue. A small cover near the center of the meter hides a screw that, when turned one full turn, will change the range of the D-meter by 74 mGal. Clockwise increases the central reading, counterclockwise decreases it. So if a D-meter makes a good measurement at CU, for it to make a similar reading at Caribou, about 3 counterclockwise turns are needed.
Reranging ALIOD G-meter
While a normal G-meter can get a reading successfully anywhere on Earth, when the ALIOD electronics are used, the range needs to be set into the +/- 200 mGal range the ALIOD displays. This can simply be done ahead of time by anticipating the difference in readings between its current location and where it will be used. Ideally you are not reranging during a survey. As the usual change of gravity with elevation is ~0.2 mGal/m, a 1000m change will move values by ~200 mGal. (Difference from CU to Caribou is ~4600' = 1400m, so potentially nearly 300 mGal and actually ~220 mGal). So to be at the same part of the meter, changing the dial reading down by 200 mGal for every 1000m elevation gain should be about right.
Taking a reading (CU and other unmodified G&D meters):
1) Place baseplate in the ground, approximately level. Try and find a spot
away from severe local topography.
2) Place gravimeter on the baseplate. Check that the temperature is correct
and that the instrument still has power (flip on switch and see light in
bubble level and in gauge).
3) Level gravimeter. Usually you level the two left screws first (for the
tilt towards/away from the reader), then use the right screw to get the left/right
level.
Advanced hint: If you know the approximate difference in elevation
and latitude from your last station, you can guess a starting value equal
to the last measurement (in mGal) - 0.2 * (new elevation - old elevation
in m) + 0.8 * (distance in km new station is north of old near 40°N).
This can speed things up as the approximate starting point can be dialed
in while the meter is locked.
4) Unlock gravimeter.
5) G meter: Make a reading. Each gravimeter uses a different reading line,
so you need to know the one for your gravimeter. If the heavy line in the
eyepiece is to the right, you need to lower the value; if it is to the left,
you need to increase the value. Occasionally the meter can get slightly stuck
on one side; if you suspect this is the case, you can gently brush the side
of the instrument (a very very light tap). The reading is made when your
dark line just touches the measuring line coming from the right side, extinguishing
the narrow line of light between the dark line and the measuring line. Too
rapid an attempt to make the measurement will result in overshoot. Long,
slow movement of the line back and forth can occur from a distant large
earthquake--you cannot make a measurement for awhile if this occurs (trains
and some trucks can do this too). Check that the meter is still level before
proceeding
D meter: If a Beam gauge is present without an allied display, instead of looking through the eyepiece, you use the Beam gauge on the top of the instrument. Bringing this to the center will complete the reading.
6) Report the reading. The last digit on the digital readout is the largest
digit on the dial. Thus if the digits read 13862 and the dial is at 2.34
the reading is 1386.234 (in meter units--which is approximately mGal) while the same numbers on the D meter would be 138.623 (you don't have to interpolate another digit)
7) Lock the instrument, dial up about 10 mGal, then unlock the instrument
and repeat (5) & (6) twice for a total of three readings. If one measurement is far out from the other two, it might make sense to take a fourth measurement with the thought that the one outlier could be a blunder.
8) LOCK THE INSTRUMENT by turning the small knarled knob clockwise all the way. Double check this. Turn off the instrument light if it was on (do not turn off the electronics on the D meter!).
Pack up the instrument in its case, making sure the power cable is not caught
in the lid.
When carrying the gravimeter, you should put two hands under the case. Do
NOT rely on the handle on top--the clasps occasionally undo themselves.
Log entries:
The beginning of the log should include the names and duties of the
field party (e.g., "John Jones scribe, Bob Smith reader, Jim Brown GPS"),
the id of the instrument being used (including any GPS unit, if applicable),
the time zone being used, and the date. A brief summary of the day's agenda
doesn't hurt.
For each station, include the station id, the time, location information
(GPS file name if doing differential GPS, an estimate of lat and lon and
elevation from GPS if applicable, elevation and position difference from
previous station if applicable), meter temperature, the measurements from
the reader. An estimate of B and C ring terrain corrections should be made
if necessary. The location of the station should be placed on a map as precisely
as possible even if post processing of GPS is anticipated. For GPS measurements,
UTM northing and easting can be a help in getting our elevations from a
digital elevation model. Making each gravity station a waypoint in the handheld
GPS can also work well.
Making a field estimate of the Bouguer anomaly using the field gravity worksheet
should be done unless there are pressing reasons not to (severe weather,
for instance). Keeping a running estimate can make it possible to recognize
both a strong gradient that might require further investigation or to identify
a blunder that can still be fixed in the field.
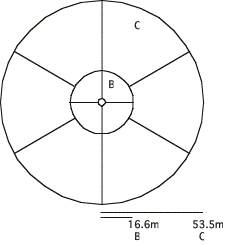
Terrain corrections:
Effects from terrain within about 50 m need to be estimated in the field
(see p. 331-335 of Burger or p. 31 of Milsom). For our level of accuracy,
variations from the base under about 2 m within zone B (2-16 m) and 7 m
in zone C (16-50 m) need not be noted. When necessary, either a small sketch
of rings B and C as in a Hammerchart on p. 31 of Milsom should be drawn
with topographic differences indicated (in m), or if on a planar slope,
the dip angle in that distance range can be indicated. Use of a Jacob's
staff can make this correction better than an eyeball guess. Note that it
is the difference of the elevation in an absolute sense that matters, so
it is usually helpful to align the compartment boundaries so that a contour
through the gravity station goes between compartments.
Survey Overview:
We try to make a base reading at the start and end of our survey and, if
feasible, in the middle of the survey as well. This is in part controls
for instrument drift, but this also can deal with tidal variations provided
the timeframe is short enough. Five measurements are made at a base reading,
not the usual three, because base readings will effect all the other measurements.
Caribou field notes:
USGS G-550 reads ~3154 at CU, 2884 at Caribou. USGS G-64 3129 at CU, 2862 at Caribou. NOAA G-157 was 3116 at CU, 2891 at Caribou. These are all aliod instruments so difference in settings kind of approximate.
Storage:
Gravimeter should be kept on power, so when returned to the lab, the AC power system should be connected properly (one cable goes from power box to the gravitmeter, one to a battery for CU system. NOAA instruments have a separate battery charger).
Please send mail if
you encounter any problems or have suggestions.
GEOL4714/5714 home | C.
H. Jones | CIRES
| Dept. of Geological
Sciences | Univ. of Colorado
at Boulder
Last modified at Saturday, October 12, 2024 10:39 AM
0 visits from