Field Campaign Organization
From Jimenez Group Wiki
Jump to navigationJump to search
A shortcut to this page is http://tinyurl.com/JG-Field-Org.
This page is a repository of information about how to organize a field campaign. It is intended for a person who has some time to deal with the organizational issues. It was created based on Jose's experience during the SOAR, and DAURE CalNex-LA campaigns, among others, but the goal is that multiple people contribute with their experiences to improve the page and keep it up-to-date.
Before the campaign starts
- Communication
- Create an email list for communication about the study. Make sure it is spam-protected (e.g. only people subscribed to it can send emails to it) as otherwise it may not be useful. For recent campaigns we have set up email lists using Google Groups which provide an easy-to-use web interface, the ability for people to add and remove themselves, and archiving of email list messages.
- Create a Wiki or Web page for the Scientific and Logistical information for the study. (DAURE examples: science page and logistics page); (CalNex-LA examples: science page and logistics page); (BEACHON-RoMBAS examples: science page, and logistics page)
- Create a Google Spreadsheet with a list of all instrumentation that will be deployed as it becomes known with key details such as technique, PI, operators, space needs, power needs, special needs (e.g. solvent or radiation source use, inlet sharing, instrument location etc.). Use this for other dynamic logistical planning, documentation. See examples from CalNex, BEACHON-RoMBAS, SOAS.
- Create a Google Spreadsheet with the dates in which different people will participate and their contact info (DAURE example; BEACHON-RoMBAS example (see "schedule" tab))
- Conference calls with the participants before the campaign are very useful to make sure that everyone is on the same page, and to avoid surprises. http://www.freeconferencecall.com is a very useful service for this purpose (free and works well). See example from BEACHON-RoMBAS telecon for example of some issues that may be relevant to early planning here (slides 27-34).
- Electrical power
- Ask campaign participants to measure the power consumptions of their instruments using a Kill-a-Watt or similar device. Just reading the power off the device may be very inaccurate. Be sure to remind people to include everything in their power accounting such as computers, additional pumps, etc.
- Make sure that enough power will be available at the field site. This is the #1 problem in field campaigns, when the experimentalists show up, it is discovered that there is not enough power or it has not been set up properly, and it is very costly and time-consuming to fix that.
- If needed for international campaigns, get plug adapters and/or transformers for the local power. These World Maps show the voltage and plug types used around the world. Note that some 60 Hz pumps with AC motors do not work under 50 Hz power. If planning a domestic campaign and international scientists will be participating, be sure and inform them of the type of power provided as they may need to bring/buy transformers to convert voltages (relatively inexpensive) or check their pump specs to be sure they can handle the AC frequency.
- The following lists of plug types can be useful: NEMA Straight Blade and NEMA Locking Blade
- Make sure to bring an AC Socket Tester and a Kill-a-Watt in your hand-luggage so that you can start testing the power outlets immediately after arrival, without having to wait for the arrival of shipments.
- If you are directly involved in planning power distribution with an electrical contractor the following documents prepared for the BEACHON-RoMBAS campaign may be useful:
- Electrical Drawings
- Panel Schedule
- Rental Trailer Spider Box Layout
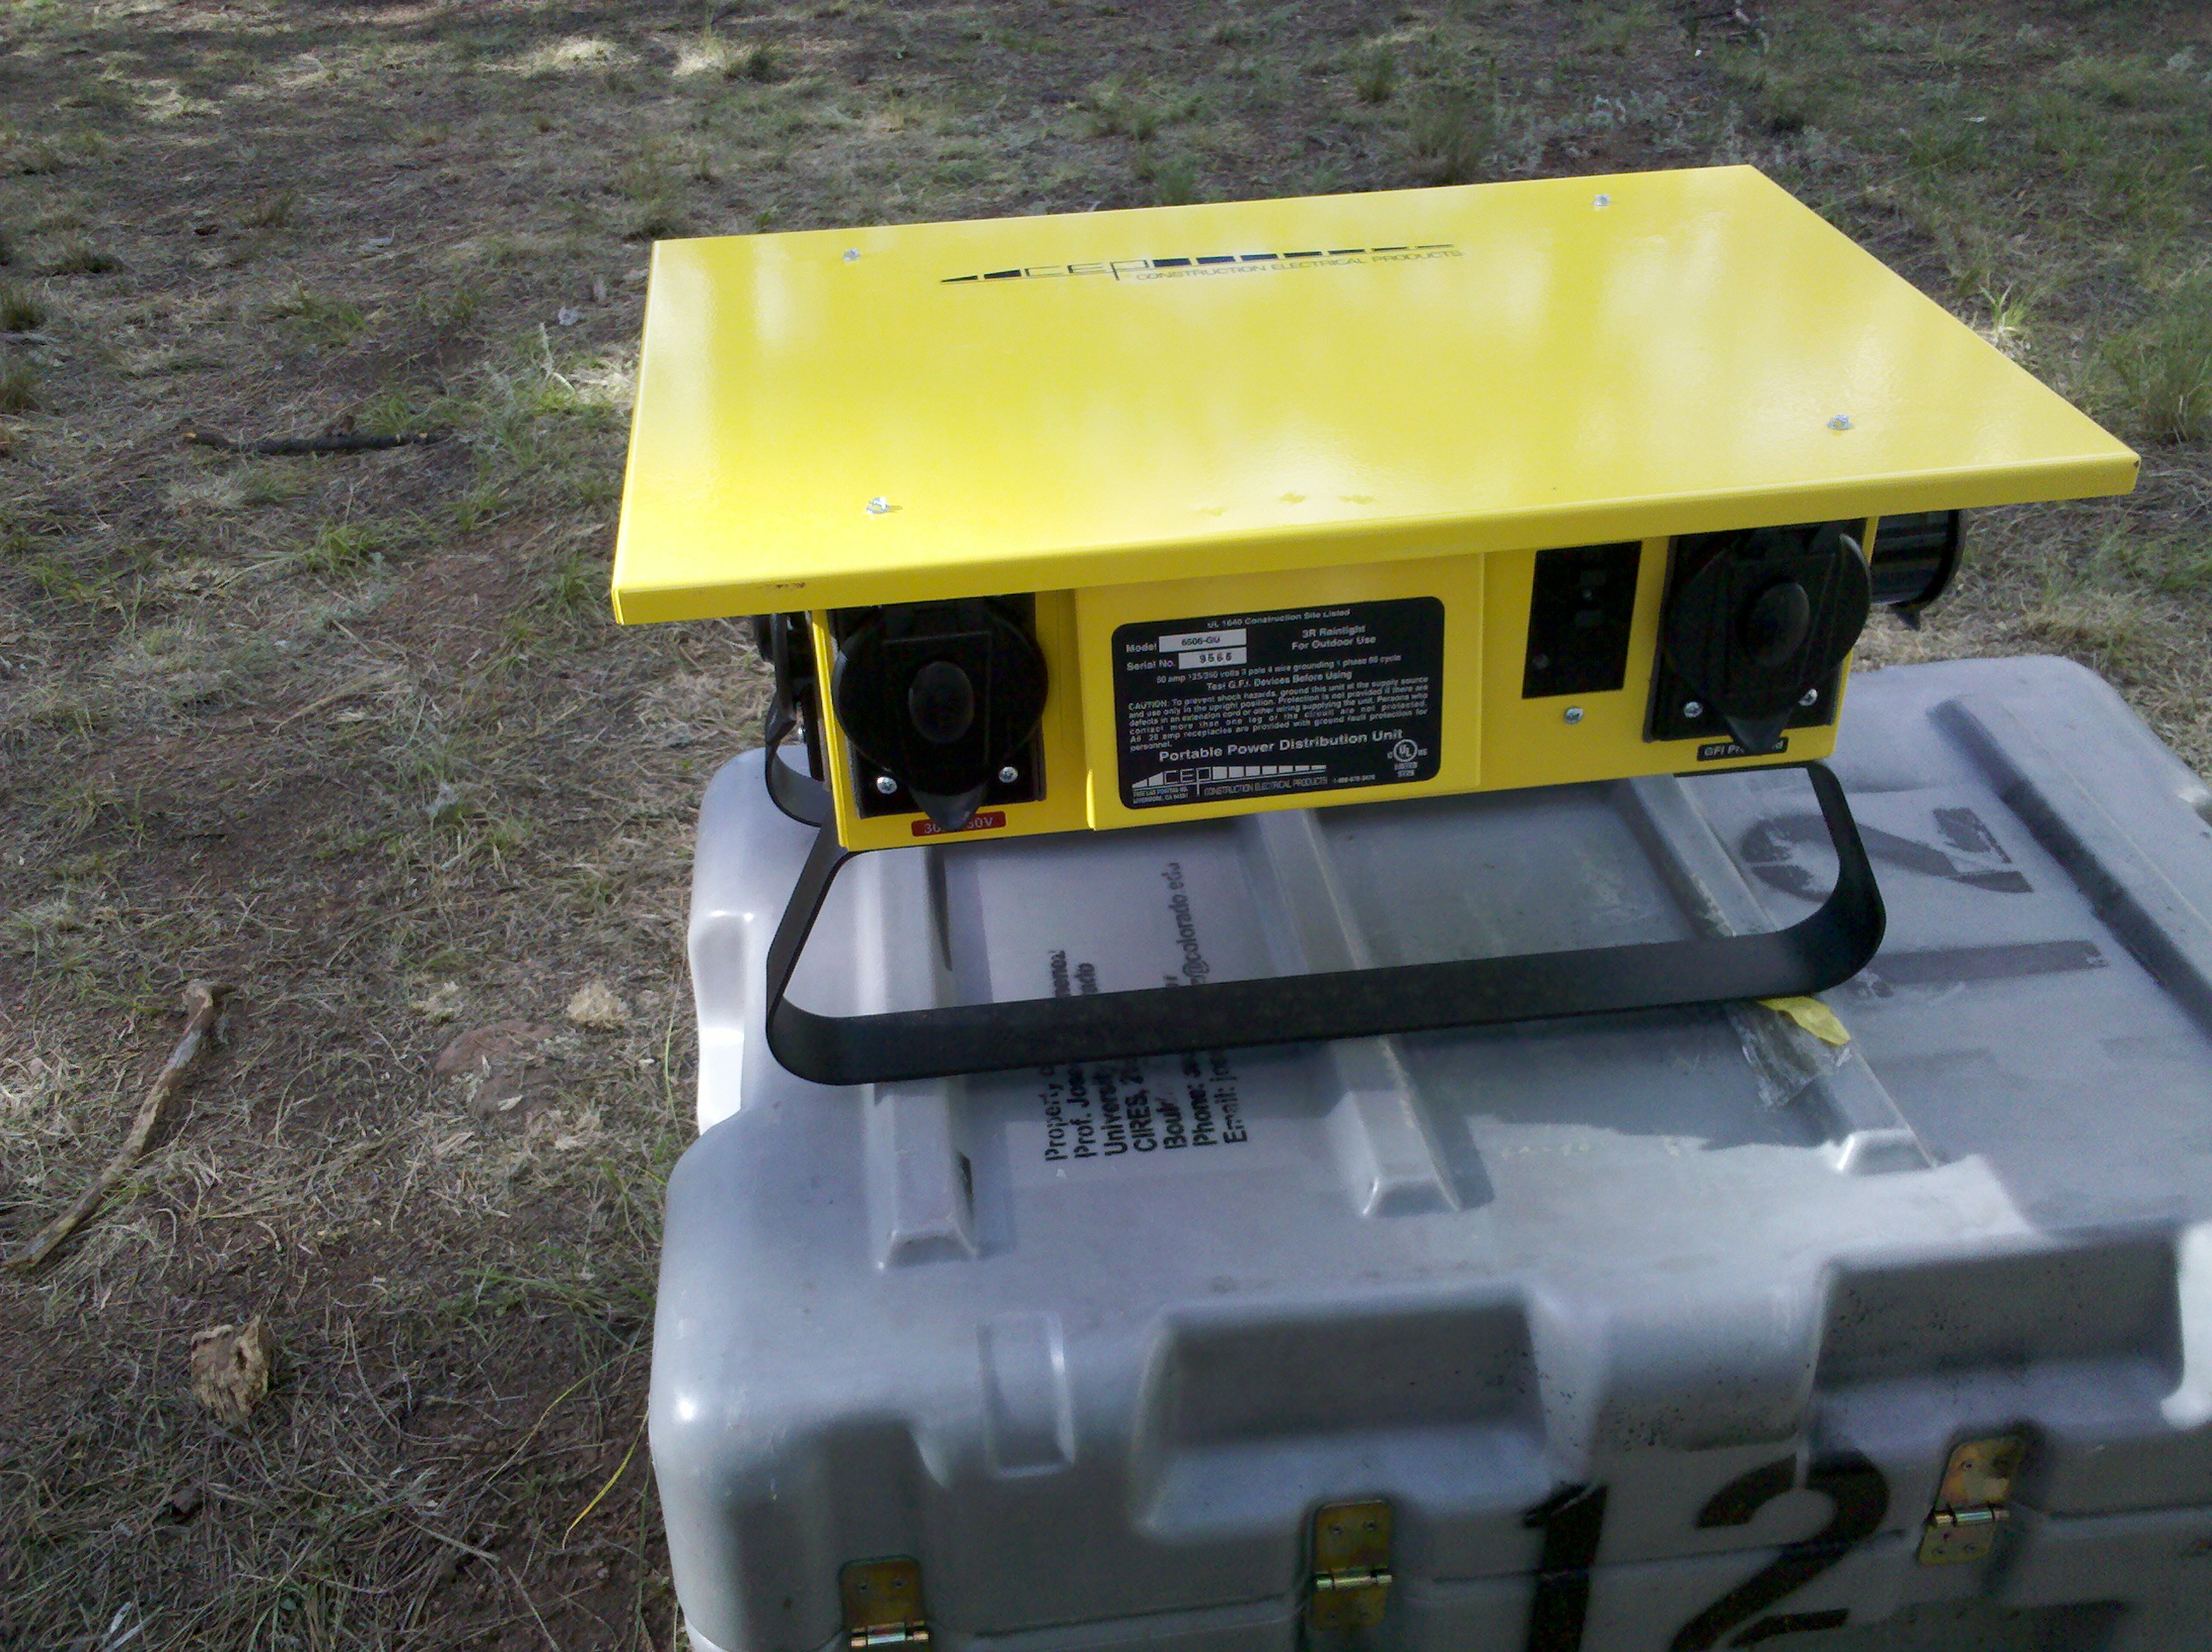
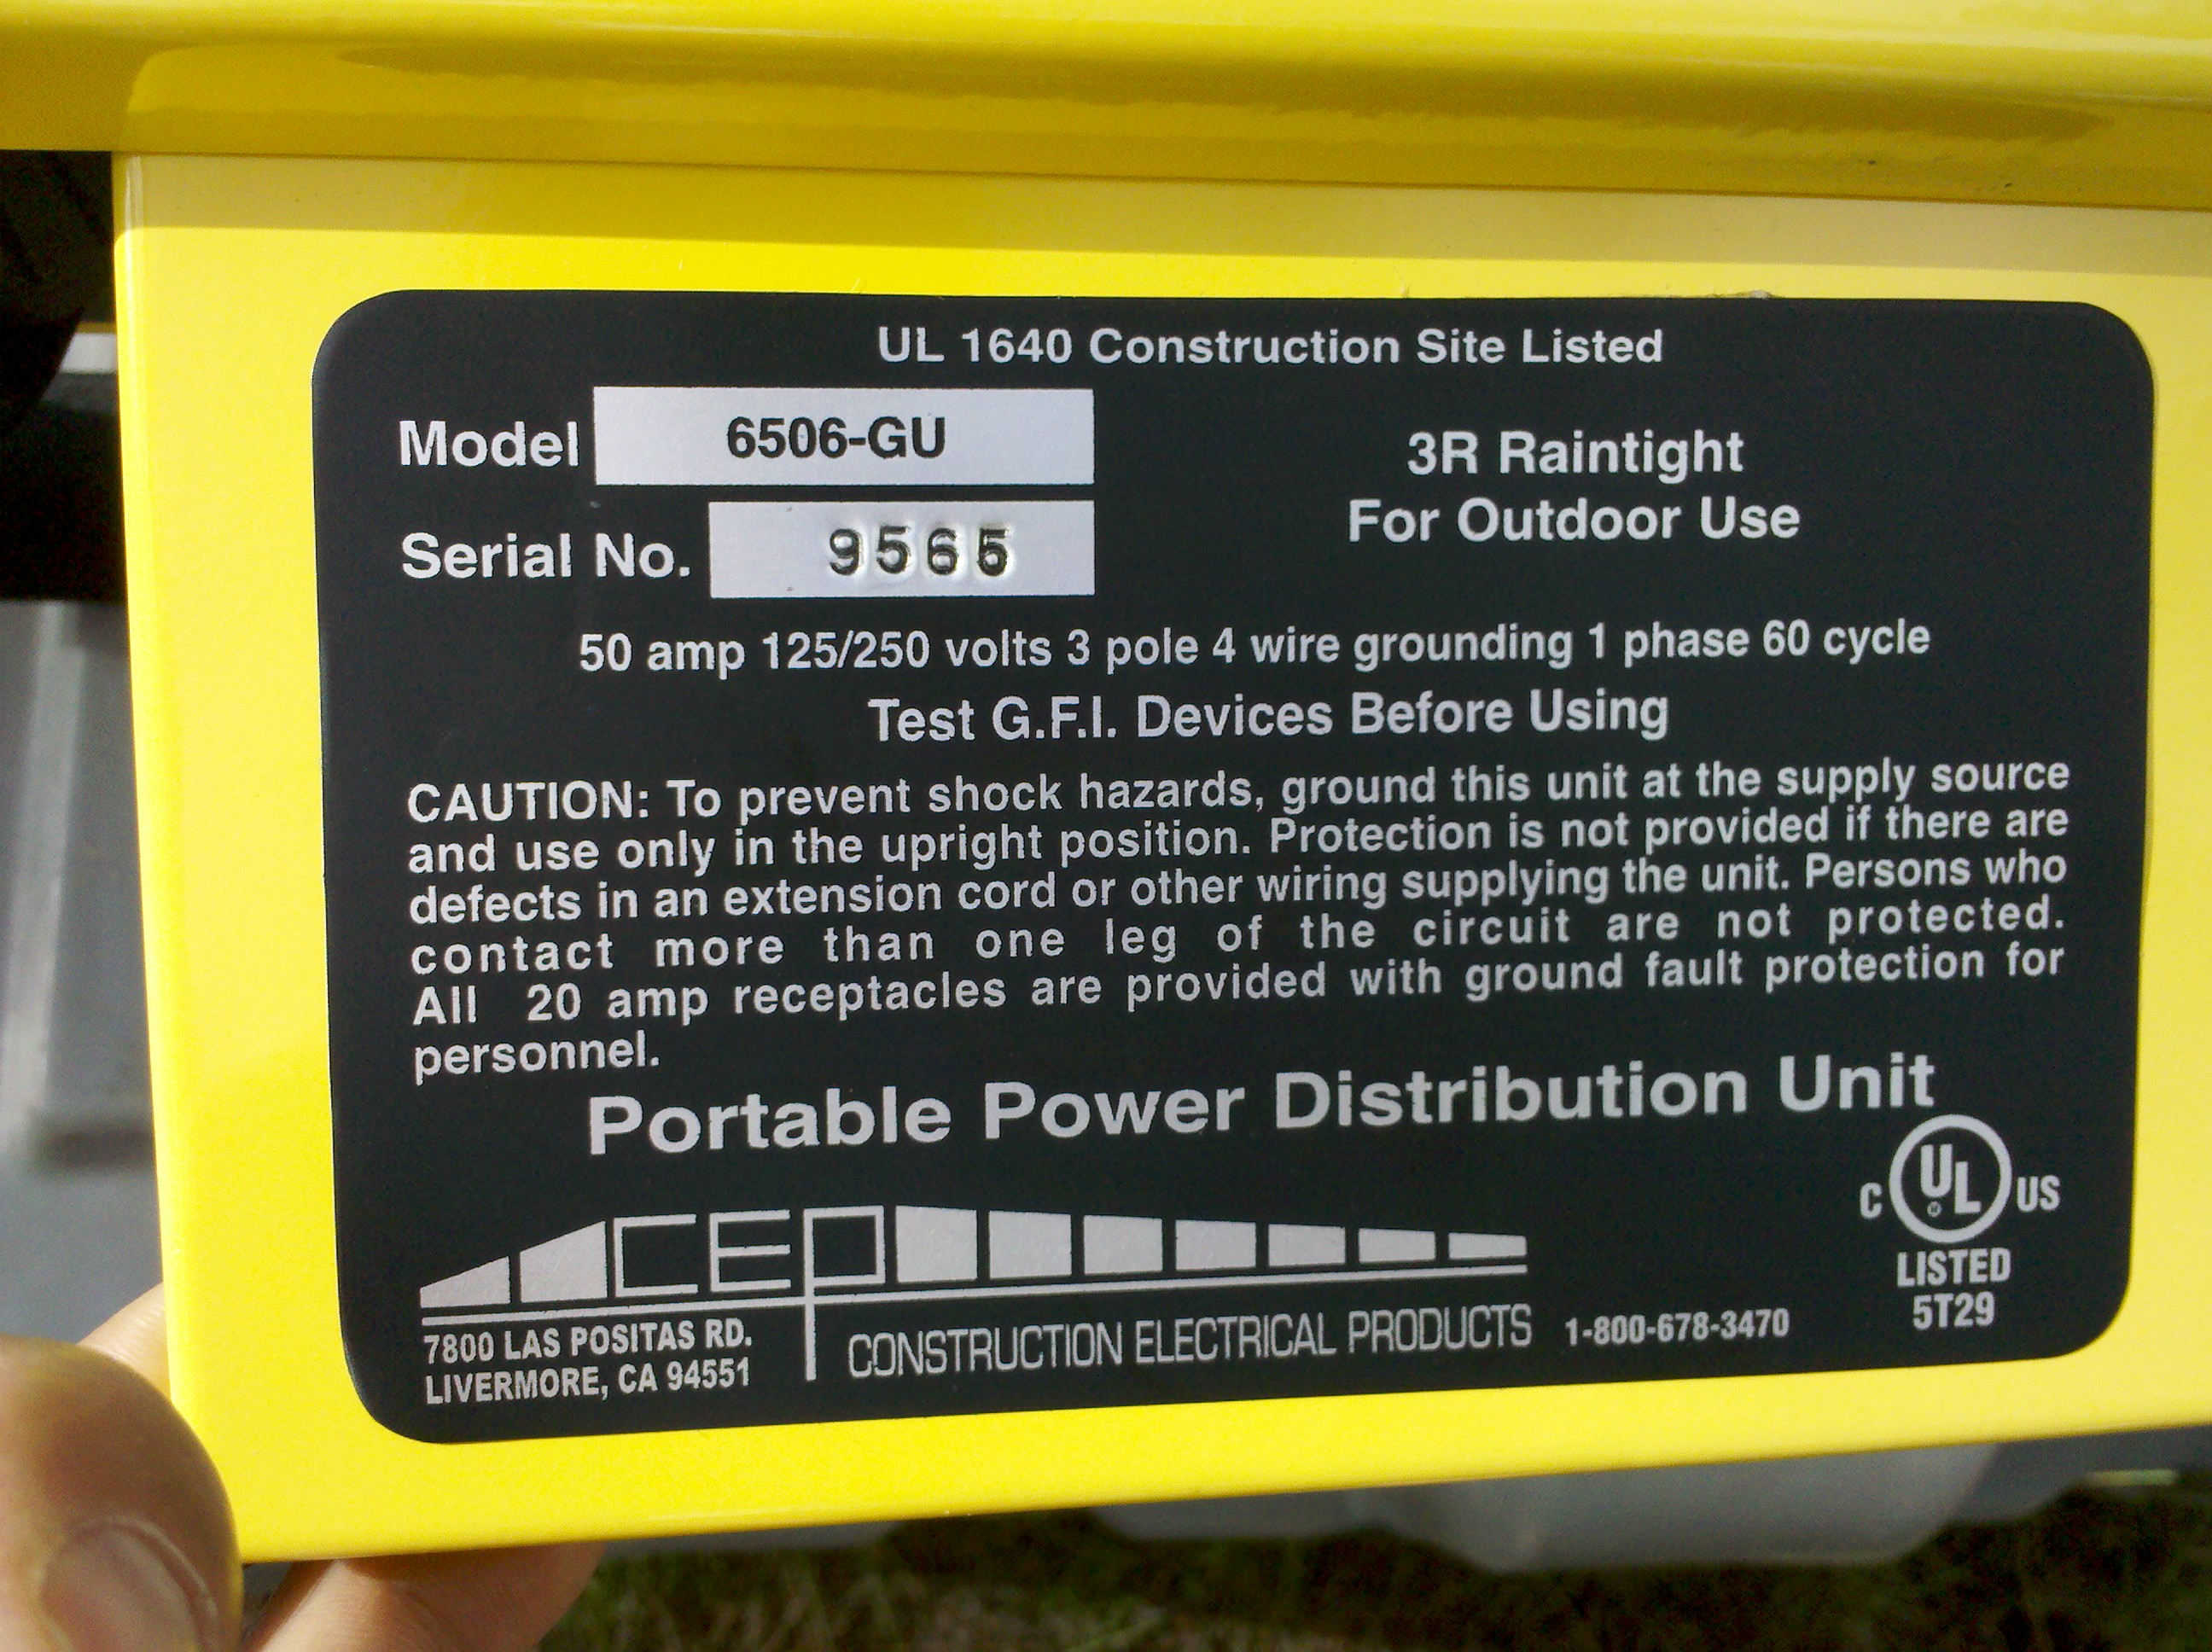
- Picture of G506-GU spider boxes used here and here. A similar spider in Amazon.
- Ideally, once power is installed (or long before the campaign if power to be used is already exists) try and monitor the power quality. With a power quality logger like this, key measures such as the AC frequency, power spikes/drops, outages, drifts in voltage can be recorded to determine if there are issues that may be problematic for different instrumentation (which may need to be fixed or mitigated). It is also a good idea to log the power quality throughout the campaign, as it can be useful in troubleshooting instrument issues that might be related to power quality/events, know how long power outages lasted, etc. A few graphical examples of such monitoring from pre-planning or during campaign are here: Planning stages of campaign in India, BEACHON-RoMBAS campaign in Colorado Rockies, Intensive campaign in Brazil (GoAmazon-IOP1) and comparison to US residential house. Several other examples (CU laboratory, residential home, BEACHON-RoMBAS, DC3/SEACR4S aircraft, CU art museum) are posted here as .fqp files generated by the power monitor linked above (and readable with the software at that link) and in some cases final data products that were provided to other researchers (see GoAmazon within).
- Other logistics
- Make a space budget and compare with the available space. If space is tight, create a floor plan specifying the location of the different instruments within the trailers or buildings/rooms and circulate it. Most likely this should also include a map of the site with the trailer/building/tower, etc. locations and power requirements for each trailer/tower/sub-location. See examples of site and trailer layouts from BEACHON-RoMBAS here. A first round can be based on the information that researchers provide in the instrument spreadsheet (see above). However, after sharing the document with the scientists often people realize other constraints/needs and typically several adjustments are needed before everyone is satisfied (within reason!). Note that this process can take quite awhile (b/c people can be slow in responding and often adjustments can lead to chain reactions of adjustments) so start early (min 4-6 months).
- Get internet connection of sufficient speed at the sites.
- For shipping of field equipment to international sites, the best way is to use an ATA Carnet with these instructions in the CIRES Website
- Find out your institution's policy on insurance coverage for a shipping. This can be fairly complicated and sometimes difficult to get clear answers, especially for international shipping (see for example CU-specific policies)
- Find out the location, and (if you don't have a smart phone or are not sure if cell phone phone service is good at the site) post/print Google Maps to stores that supply hardware (such as Home Depot in the US) and electronics (such as Fry's or Radio Shack in the US). Also get maps if a remote location.
- Start planning for shipping of radiation sources early. Every US state and country has different policies. Check with your institution's EH&S. If shipping directly from your institution to the site is not an options, sometimes you can pay a fee to have either ship to a vendor and have them ship it to the site or buy a new source from a vendor and have it shipped directly to the site.
- If available, plot up basic meteorology and trace gas measurements previously made near/at the site during similar time-of-year (diurnal cycles, wind/pollution roses). See examples from BEACHON-RoMBAS
- Data sharing
- Establish a data format (DAURE example; BEACHON-RoMBAS example)
- Propose a policy for sharing data and circulate it among the campaign participants (DAURE example, BEACHON-RoMBAS example)
- Create an SFTP server for uploading both preliminary and post-campaign data (DAURE example; BEACHON-RoMBAS example).
- Ask people to install the software needed to access an SFTP site: e.g. WinSCP for windows and Cyberduck for Mac
- Site visit
- Clearly someone will need to visit the site as part of the selection and planning, often more than once. Some things to do during these visits include:
- Take lots of pictures, post, and share.
- Identify relatively flat/clear locations where trailers can be located (if applicable).
- Think about where a porta potty might be located if needed (downwind or crosswind of sampling site - see climatic met plots if available).
- Test if cell phones work. Try different providers if possible. Is 3G, 4G available?
- MANY OTHER THINGS: See logistics page wikis linked above for ideas of what to think about for your site.
- Clearly someone will need to visit the site as part of the selection and planning, often more than once. Some things to do during these visits include:
- Renting trailers
- If rental trailers are needed, those from Mobile Mini have worked well in previous US campaigns.
- Questions to confirm with rental company (esp if not Mobile Mini):
- Are they all 8’ wide and completely out of metal?
- Will these be on wheels or delivered on flatbed trucks? Roll-off or crane?
- Any special requirements for leveling them and securing them to the ground?
- Ask for layout/dimensions. Yow many windows/doors?
- Can all the window panes be completely removed?
- Are the security bars in front of the windows welded to the frame?
- Can people walk on the roof? Can the roof support a certain load? How much?
- How many HVAC units, one on each end for longer ones (40')? What tonnage?
- Will they be fitted with standard electrical and phone/data access panels?
- We don’t need internally wired electrical outlets and only lights, will that reduce the price?
- Price? Typically $100-$150 for delivery/pick-up each and ~$350/mo rental (40')
During the setup period before measurements start
- Verify that the power outlets are wired properly with an AC socket tester
- Verify that the voltage of the power outlets corresponds to expectations
- Label all the outlets with their circuit number with a sharpie. This should be done before the instrumentation is installed. The simplest way is to switch off all the breakers but one, see which plugs still have power and mark them, then add a 2nd breaker etc. There is also a Circuit Finder tool than can be bought at Home Depot and similar stores, which allows identifying circuits without turning off the power. (Remove the breaker panel cover if it doesn't work well with the cover on, metal covers in particular reduce the signal enough that this can be a problem). There are also more expensive professional-grade tools to do the same such as the Greenlee 2011.
- If possible and if this information is not already known, measure the power consumption of the different pumps and instruments with a Kill-a-Watt. Also, once instruments are coming online consider measuring the total power consumptions at each circuit box (with an inductive current meter such as this one.)
- Create a power budget and post it in a prominent place at the site (possibly including the shared instrumentation doc).
- Ask the electrician if it is necessary to balance the power at the main or the different distribution centers (e.g. each trailer).
- Tape over power outlets that cannot be used because the circuits are already maxed out, and write a note of who to contact with questions about the outlet.
- Have an onsite meeting a few days before the start date and discuss general logistics such as safety, what to do when circuits are thrown, access to site, driving on site (scheduled gas deliveries or not at all?), etc.
When the campaign is starting to gather data
- Remind people to start submitting data to the SFTP site and to update them every few days
- Create a spreadsheet showing which data has been uploaded, has been acquired but not uploaded yet, and won't be available due to instrument problems DAURE example
- Make sure the data which is starting to be submitted includes enough header information, including the time used (e.g. local, standard, UTC), the units for the m3 (STP and which definition, ambient, other) for concentrations reported ug m-3, etc.
- Establish a schedule for science meetings (once a week worked well for DAURE, CalNex-LA, and BEACHON-RoMBAS but this depends on how many sites are there and their distances etc.)
- Start plotting all the data in "Master Plots" for each site (see examples from: DAURE, BEACHON-RoMBAS). This allows detecting early problems with instruments and data formats, agreement or differences between similar instruments, etc.
- Take pictures of site, trailers, instrumentation and post them on a shared location. See example from BEACHON-RoMBAS
- Inspect pumps/exhaust to be sure people are filtering particles (e.g. oil or carbon vane pumps) or scrubbing gases (CPC butanol via H2O). Consider using a handheld particle mass (e.g. TSI DustTrak) and/or particle # (CPC) detector.
After the measurements are over
- Discuss and agree on dates for uploading revised and final data to the data server. 4 months after the campaign is typical for revised data, and ~9 months is typical for final data.
- Organize conference calls, starting ~3 months after the end of the campaign, to discuss preliminary data and results
- Agree on a date and location for a data analysis meeting, normally 9 months to 1 year after the campaign (if it happens earlier people normally have not digested the data yet and it is less useful)
- Agree on the main conference venues / special sessions for presentation of results (e.g. Fall AGU, AAAR, EGU...)
- Encourage others to share pictures and post them on a shared location such as Picassa. See example from BEACHON-RoMBAS
- Encourage others to share pictures of site, trailers, instrumentation and post them on a shared location such as Picassa. See example from BEACHON-RoMBAS